Sunday, January 10, 2016

The Family Trees


I have 2 peach trees just off the raised bed garden. They have never produced any viable fruit. Honestly, I think this breed is not meant for this far north but even if they never give me a single, juicy peach, they will always remind me of my childhood and my grandparents.

See, I have lost all of my grandparents at this point in my life. I even had the honor of knowing 4 of my great grandparents, one into my adult life. I don’t know how often that happens but I cherish the time I had with each of them. My father’s side of the family were strong farmers. The property my parents still live on was once part of 1000 acres given as dowry to my great, great, great grandmother. It has been farmed since that time in one way or another, over time being split up among the children of each generation.

My grandparents still had 475 acres, if memory serves, when I was growing up. It was dotted with fields, gardens, orchards and ponds. Many days were spent as a child with one or both of my grandparents walking or riding over that property. The older I became, the more I helped at harvest time, picking produce, shelling peas, helping as my grandmother canned or froze different things, or throwing her kitchen scraps around her blueberry bushes. But the best thing ever was fleeting and only available for a few weeks in the summer.

One of the orchards was full of various breeds of peaches. The best one was an Elberta tree. It produced what my memories store as a huge, bowl filling peach. Juicy and flavorful. Best chilled in the fridge but just as delicious fresh off the tree. Thanks to this tree, I will never have a peach that even comes close to good from a store. In fact, I hate buying fresh peaches. I do love peaches though, so when I am able to get some fresh from a farm I enjoy them, but nothing will ever be as good as those memories.

At some point after I married and moved away my grandfather had to do away with the orchard due to a blight of some sort. I was heartbroken, but such is the life of a farmer. You grow what you can, but if the land and the plants can’t produce, you have to change the equation somehow. I was sentimental so I didn’t want to see it go. Time moved on and after they both passed, my brother had the opportunity to obtain the family home.  

Remember those kitchen scraps I would help throw out? Well, often they contained peach pits. While my grandparents were alive they would keep any sprouts under control so it didn’t overtake the blueberry bushes. My brother, knowing how sentimental I was about that orchard, saw a couple small seedlings that he could transfer to a pot and give me for mother’s day several years ago. No store bought gift could ever compare to that. I know they cannot be from the same trees I picks peaches from in long sleeves in the hot, humid mornings of July so long ago, but they came from those kitchen scraps of my grandmothers.


I brought those seedlings home and proudly planted a piece of my childhood home on the property of my adult home. Each year they have gotten bigger and fuller. I have learned about pruning and how difficult it is to organically care for peach trees. I have been excited as the blooms appear in the spring and small green fruit a few weeks later. I have been disappointed as all of it withers or falls off, poisoned by the eggs of some wasp that reaches it in the bloom stage. But regardless, I love those trees, even if I never get a peach because every time I see them I see my heritage and where I came from. I see what I am capable of and where that strength comes from. I see my family tree… all of it. Every branch making me who I am today. 

Thursday, January 7, 2016

Setting up the Coop

This spring, my loving husband unknowingly may or may not have made the worst mistake of our marriage. When he ordered some chicks to replenish the egg laying flock he asked me if I would like to order some . He didn’t know what he was asking, I didn’t either for that matter. All I saw were dreams of colorful eggs and chickens of my own to name and care for. I was extremely enthusiastic!

He placed the order for my little ameracuna chicks and I began looking for coops. It was not long before I realized I was not going to find what I wanted and had dreamed of after spending hours finding the perfect pins for my chicken board on Pinterest. Fortunately, not realizing how much more he was sinking into this quicksand, he offered to see if he could get a friend of ours that is a talented carpenter to build me one from some wood we already had on hand. And I was thrilled!

Our friend came out and he and my husband went over the things I wanted (I was at work at the time so I didn’t get to take part in this conversation.) We had found several examples I liked with different features for him to use as an example. Once the general plan was in place he jumped into action and progress began to be made.


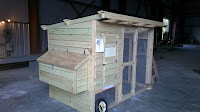
Our friend is very talented and takes a lot of pride in his work and how to make his customer happy. I am the customer in this equation, not my husband who is paying him. My inexpensive, work with what you’ve got project, quickly turned into a poultry mansion. It is so well made and with such high quality lumber, it will survive longer than our house. Don’t get me wrong, it is beautiful! It matches our house right down to the tin roof color. (Now I must say this as well, my loving husband could have said "stop being extravagant" at any point but he didn’t. I think he wanted a happy customer as well.)

During the time Poultry Manor (as it was so lovingly called by my husband’s employees) was being constructed we received our little pompoms. They spent time in the brooder box and grow out pen, while finishing touches were put on the coop and it was moved into place. Once in their new home, they loved it! 

 It has wheels which allow it to be moved around the yard as needed. This will be put to good use when the spring gardening season approaches.  It does not roll as well as we had hoped on the grass and dirt but we can move it easily if we use a team approach!

The following pictures show how I set it up initially. After actively using it for a while some aspects have changed but nothing major.  Enjoy!

I added a heavy duty plant hanger to the side to hold up the lid to the nesting boxes so I can work in it without holding on to the lid. 

The floor of the coop is covered with a thick, plastic sheeting that is more durable and less expensive than linoleum.

At the bottom of each of the nesting boxes is a sheet of rubberized shelf liner. This protects the eggs when they are "dropped" in the laying process. Since my girls are young and we are just now supplementing their calcium those eggs can be fragile.

Initially I used pine shavings for the bedding but they scratch it out so fast and it doesn't break down as well as the straw. Also My husband did not want to add the wood shavings to the compost once the coop is cleaned. We have since changed to straw.
I wish I had taken a picture of the ramp and the ingenuity our friend put into it. The hinge is an old leather belt cut down and stapled in place. The bottom of the ramp has a small metal ring that loops over a bolt above the door. When we move the coop,the crew is herded into the upper portion and I "latch" the ramp closed, keeping them contained so we can safely move the coop without fear of poultry injury. 

Since we cannot truly free range and the coop is mobile we have a temporary run for them as well. It is simply 4 foot fence post and 3 foot poultry wire. As we move the coop, we can easily move the fence, shaping it as needed.

Recently, we found a durable yet lightweight netting and I used cup-hooks to hold it in place against the coop.

The netting is very wide and stretches all the way across the front of the coop and over the small run. I use the prongs on the posts to hold it in place. 

Now that winter is upon us and the temps are dipping lower, we don’t worry as much because of the area of the country we live in.  However, there are a few things I am prepared for. One, I have plastic sheeting and a staple gun in the event we need to put up a wind barrier. Secondly, I am going to add a little curtain for the door to give them some protection from the cold at night. The roost is well above the door line but in colder weather with slight wind gusts, the temperature could be effected. They would have even more protection if they would leave the straw in place, so some corrections in the form of a lip of some sort may be needed to discourage them scratching it out. 

Not too bad for a first coop. If we decide to build another one like this in the future there will be some things we will want to change but they are simple or personal preference. Hopefully there are some things you can use from this if you are just starting out with a coop or if you have any suggestions for me please share, 

Friday, January 1, 2016

DIY Elderberry Elixir*

Rosemary Gladstar is one of the foremost herbal authorities and her elderberry syrup recipe (Gladstar, Herbal Recipes for Vibrant Health, 2008) is the one I have used for years. A couple of years ago I added an elderberry tincture (Gladstar, Rosemary Gladstar's Medicinal Herbs: A Beginner's Guide, 2012) to the mix. Using about 2/3 tincture and 1/3 syrup mix stored in a 4 ounce dropper bottle I created an elixir of sorts without the spoiling the benefits of each separately. This year I ran across an elixir recipe that intrigued me. Thankfully I had the foresight to document the process.

To begin I started with all organic ingredients. I feel that you should only use the highest quality products for the highest quality results.


The elderberries were ordered from Rose Mountain Herbs. They can seem a little expensive but for the value they provide it is worth it. The vodka is an organic label we discovered recently. It has a pleasant, mild flavor and is not any more expensive than other upper shelf vodka on the market. The honey is not local, raw honey but it is organic from my local store. For this first attempt I wanted purely organic but for the next batch I think I will use the local, raw honey instead. I get a better energy from the local honey.

Next is the measurements. The recipes calls for the following measurements but, as you will see, I had to make some alterations.
1 quart jar
2 cups Elderberries
3 cups brandy or vodka
1 cup honey


In effort to have fewer dishes to clean up I used the same measuring cup I measured up the elderberries in to measure the vodka. If you do this rinse out the measuring cup afterward. You will see why in a second.


Three cups of vodka would not fit into the 2 cups of elderberries in a quart jar and leave room for the honey. I don’t know if I measured too much of these two and threw off the proportions but as you can see behind the honey there was still a good bit left in the measuring cup. If you have rinsed out the cup after measuring the elderberries you should be able to pour it back into the bottle, very carefully of course.
Next I added the honey to fill the jar.


Using a butter knife I stirred it thoroughly to mix in the thicker honey with the vodka.
To the pantry to sit and wait for 3 weeks. I like writing the beginning and ending dates on the lids with a dry erase marker so I know when to take them off.


After shaking periodically over the last three weeks and keeping it in a dark cool place, today was the day to try it.


It has a very nice “cough syrup” consistency and a slightly alcohol flavor. I think next time I will use just a little less of the vodka, but I have to be careful to keep it shelf stable. This can stay as is in the same dark pantry indefinitely as long as that ratio is maintained to preserve the sugars. If you are in doubt of your balance store it in the refrigerator. I have had my mix from last year in the fridge with no deterioration or loss of potency.


*As always, this is not meant to replace professional medical advice or treat any manifested illness. My family and I use this in a nutritional supplement way to boost our immune system and prevent illness. If you feel you have any illness please consult a medical professional for treatment methods.