This spring, my loving husband unknowingly may or may not
have made the worst mistake of our marriage. When he ordered some chicks to replenish the egg laying flock he asked me if I would like to order some . He
didn’t know what he was asking, I didn’t either for that matter. All I saw were
dreams of colorful eggs and chickens of my own to name and care for. I was
extremely enthusiastic!
He placed the order for my little ameracuna chicks and I began
looking for coops. It was not long before I realized I was not going to find
what I wanted and had dreamed of after spending hours finding the perfect pins
for my chicken board on Pinterest. Fortunately, not realizing how much more he
was sinking into this quicksand, he offered to see if he could get a friend of
ours that is a talented carpenter to build me one from some wood we already had
on hand. And I was thrilled!
Our friend came out and he and my husband went over the
things I wanted (I was at work at the time so I didn’t get to take part in this
conversation.) We had found several examples I liked with different features
for him to use as an example. Once the general plan was in place he jumped into
action and progress began to be made.
Our friend is very talented and takes a lot of pride in his
work and how to make his customer happy. I am the customer in this equation,
not my husband who is paying him. My inexpensive, work with what you’ve got project,
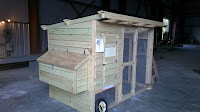
quickly turned into a poultry mansion. It is so well made and with such high
quality lumber, it will survive longer than our house. Don’t get me wrong, it
is beautiful! It matches our house right down to the tin roof color. (Now I
must say this as well, my loving husband could have said "stop being extravagant" at any point but he didn’t. I think he wanted a happy customer as well.)
During the time Poultry Manor (as it was so lovingly called
by my husband’s employees) was being constructed we received our little
pompoms. They spent time in the brooder box and grow out pen, while finishing
touches were put on the coop and it was moved into place. Once in their new home, they loved it!
It has wheels which
allow it to be moved around the yard as needed. This will be put to good use
when the spring gardening season approaches.
It does not roll as well as we had hoped on the grass and dirt but we
can move it easily if we use a team approach!
The following pictures show how I set it up initially. After actively using it for a while some aspects have changed but nothing major. Enjoy!
 |
| I added a heavy duty plant hanger to the side to hold up the lid to the nesting boxes so I can work in it without holding on to the lid. |
 |
| The floor of the coop is covered with a thick, plastic sheeting that is more durable and less expensive than linoleum. |
 |
| Recently, we found a durable yet lightweight netting and I used cup-hooks to hold it in place against the coop. |
 |
| The netting is very wide and stretches all the way across the front of the coop and over the small run. I use the prongs on the posts to hold it in place. |
Now that winter is upon us and the temps are dipping lower,
we don’t worry as much because of the area of the country we live in. However, there are a few things I am prepared
for. One, I have plastic sheeting and a staple gun in the event we need to put
up a wind barrier. Secondly, I am going to add a little curtain for the door to
give them some protection from the cold at night. The roost is well above the
door line but in colder weather with slight wind gusts, the temperature could
be effected. They would have even more protection if they would leave the straw
in place, so some corrections in the form of a lip of some sort may be needed
to discourage them scratching it out.
Not too bad for a first coop. If we decide to build another one like this in the future there will be some things we will want to change but they are simple or personal preference. Hopefully there are some things you can use from this if you are just starting out with a coop or if you have any suggestions for me please share,
Not too bad for a first coop. If we decide to build another one like this in the future there will be some things we will want to change but they are simple or personal preference. Hopefully there are some things you can use from this if you are just starting out with a coop or if you have any suggestions for me please share,


No comments:
Post a Comment